(This blog post is a detailed description of this my Youtube video)

Hi, everyone! Today, I would like to share with you some ideas for making glaze test tiles for a beginner.
This method will not make results as an industry standard, but you can add additives to your original or ceramic shop's colorless glazes you already have as a base glaze, with minimal materials and tools to see for additive’s color and texture development. So it's an easy way to experiment at your home studio. Now let's get started.
Preparing test tiles and tools

First, prepare test tiles. Since the color and texture of the glaze can be affected by the compatibility with the clay you used, so I recommend to make tast tiles with all types of clay you usually use.
Divide the test tile into rectangular plate-like sections, and write the proportion of each additive to make it easy to understand. This time, I made five sections for test additives ranging from 1% to 15%.

In addition, made one-piece test tiles, which can also serve as a sample of the glazes. Making an original mold will make it look good when lined up.
Then, let’s make a bisque bowl. If you pour the liquid glaze into the thick bisque bowl, you can remove the moisture to make the glaze into a powder.

This way, you don't need to blend a basic glaze from scratch for the test tile, so it's convenient to have several bisque bowls. Also, large bisque bowls help to absorb the moisture of the clay scraps mud to recycle the clay and keep the plasterboard occupied for a longer period of time.
When everything is ready, dry all the test tiles and bowls, and then fire them. I fired them at a low CONE04 to increase their absorbency.
Preparation of Mixing Glaze

To perform the glaze coloring test, let's make the base colorless glaze into a powder. Stir the glaze well and pour it into the bisque bowl. After leaving it for a day, the moisture is absorbed into the bowl and solidified, so break it into a powder with a pestle or some tool. It doesn't have to be strictly in powder form, as long as it can be dissolved in water. When it becomes as powdery as the picture above, it is fine.

This time, I used two types of base glazes with a matte texture. The recipe on the right one is from the book: Amazing Glaze: Techniques, Recipes, Finishing, and Firing (Mastering Ceramics). The ingredients consist of EPK, Wollastonite, Ferro Frit, and Silika, but if you want to know the details, refer to this wonderful book. It contains recipes for many glazes and was a lifesaver for me after my previous recipes came to nothing when I moved internationally.(The materials for ceramics depend on the land.)
But the glaze on the left side is my original so I can tell you about the it here.

The formula is very simple, just mix Caster Feldsper : EPK : Wood Ash (synthetic) in 7:1:2.
This is the most basic glaze formulation in Japan (That's why I named this JP.) and consists of only three ingredients: soda feldspar, kaolin, and wood ash. Therefore, technically, you may use any feldspar or kaolin, not limited to the materials listed above. Wood ash may not be common in pottery stores here, but it can also be made from fireplace ashes by elutriation, so if you are interested, please try it (Maybe I'll show you how to do it on my youtube sometime soon).

Before applying glazes on the test tiles, write the name of the basic glaze and the additive to be tested on the test tile, with cobalt oxide or iron oxide dissolved in green tea. The polyphenols in the green tea allow those pigments to sit well on the unglazed base. When making homemade underglaze, it is also recommended to dissolve it with green tea.
Mixing Test Glazes
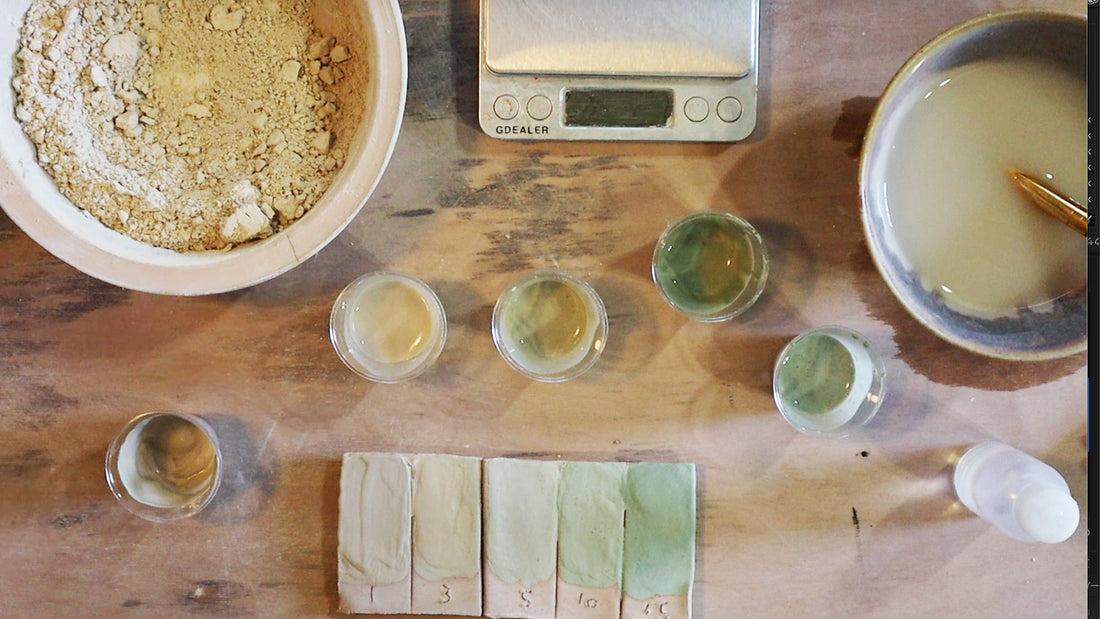
Now, let's blend the glaze to be tested. The more accurate the amount of the test, the better, and it is desirable to have about 50 grams, but this time I made it in 5-gram increments because I don't want to consume too much materials. (Yes I am cheapo! )
The scale for measuring the glaze materials should be able to measure to 0.01. A plastic cup for tasting is useful for making test tiles.

First, I made a test tiles with copper carbonate. Since the glaze material is dangerous when inhaled, be sure to wear a dust mask befor mixing the materials.It is safer to wear plastic gloves, though I don't in the video.
In this video, I used many hazardous materials that may be harmful, but as long as you are careful about the amount of the formulation, the ionized metals trapped in the glaze do not usually dissolve, so they are safe to use in tableware, except for manganese dioxide.
If you are concerned that your homemade glaze meets food safety standards, dip your finished piece in vinegar and let it sit overnight to see if there is any change in color or texture. If there is a change, it means that the glaze may be dissolved by acidic ingredients such as dressings. Most glazes using manganese dioxide cannot be used on areas of the tableware that come in contact with food. Areas such as mug handles are fine.

Measure the basic glaze into a number of the section of the test tile and add each percentage of the section. Then, mix it with water well with a brush and apply it to the test tile. Repeat this process for each section of the test tile and test different additives.
Cobalt carbonate itself is highly toxic, but it is a fun additive that produces various colors depending on the base glaze. It has the potential to show a wide range of colors, from turquoise blue to berry red.

This one for manganese dioxide, which is equally toxic itself. Manganese dioxide is a mysterious material that can produce metallic colors depending on the recipe, but what kind of color will it produce on its own?
If you knew the right amount of additives to add, make just one test tile with only the amount of that formulation. Now I’m using cobalt oxide (toxic!), which produces a very bright blue color with just a slight 1% addition.

On the other hand, cobalt carbonate, which is toxic purple powder, but also produces the same blue color with oxide. I want to see how it differs with the same amount of addition. The right side is cobalt oxide and the left side is cobalt carbonate. At this point, the colors of the glaze are different. The specific gravity of each powder is also different, with cobalt carbonate having a lighter specific gravity.

I made rutile oxide test too. It has the effect of creating a fuzzy texture, milky white color, or a vintage look to the glaze. What kind of changes can be seen depending on the mixture?

This is for strontium carbonate, which is not a colorant but an additive that controls the texture of the glaze. When added to gross glazes, it lowers the melting point, making it more glossy, and by making it sticky, it also prevents glaze surface from cracking, making it an essential ingredient for those who want to sell their work wholesale. Let's see what happens when added to a matte-textured glaze such as the one I'm using.

Now, the all test pieces are done for this time. The first and second ones from the upper left are using two types of basic glaze with cobalt carbonate. Followed by strontium carbonate, rutile, and manganese dioxide. From the upper left are my personal tests (so its secret), cobalt carbonate, cobalt oxide, and copper oxide, which produce a green color. Now, let's fire them and see what the result will be.
Results

The firing of the test is complete. First, this color is produced by 5% copper oxide. It turned out to be a beautiful green color with the only addition of copper oxide alone, called Oribe in Japan.

The color produced by 5% copper carbonate looks almost the same. But, the color is so different just by using a different base glaze for the same copper carbonate.
It has a metallic texture like charcoal or rusted iron.

Speaking of creating a metallic texture is manganese dioxide, but it became just a brown glaze when added alone.

Rutile also varies greatly depending on the amount used. The impression changes a lot between 1% to 5%.

This is strontium carbonate test tile. It lowers the melting point and increases the gloss, but when mixed with a matte textured glaze, it creates a strange texture. The 15% blend left some areas glossy and matte. With more research, it would make an interesting glaze.

This, on the right, is cobalt oxide, and on the left is cobalt carbonate. Cobalt carbonate is slightly less vivid. It is also lighter in specific gravity, so it might easier to use when you want to control a subtle blue color.
Conclusion

That's all for this time. I tested individual additives this time, but glaze making has infinite possibilities for color and texture changes with combinations of two or more additives.
For example, chrome oxide, which has a dull green color, becomes a candy pink when added to tin oxide. Manganese dioxide, used alone in this case, develops surprisingly, a shiny, metalic bronze color when formulated with several other ionized metals.
Please look forward to the next glaze test. Thank you

Selfie of an Assistant of the Year